I can't believe its December already! I am so behind on my Christmas Shopping! Anyways, this is how I spent my Friday night with a friend. -- haha.-- totally old person status! Literally we started our project around 10 pm and didn't finish till 3 am! -- We also watched Bridesmaids while crafting!
Here's what you'll need
-wood board ( any size) -- cheaper at Home Depot-- cut it down to any size
-Mod Podge
- Lace Sheet or Other Fabric ( LAce works well because you can see through it)
-Paint ( Acrylic or Wood Paint)
- Ribbon
-Paint Brush
-Glitter- any color ( I used turquoise )
Glue- Glue Gun & Fabric Glue
-Sequins or Rhinestones ( or Pearls! )
-Sand Paper-- ( I used 150)
- Jewelry Hooks
Here is a photo of my girl Jewels board (left) and mine ( right)
2. Use your Acrylic ( or wood) Paint, and start painting the front of your board
3. After you've painted the board, let dry for 5 minutes.
Then, use your Mod Podge & Glitter ( I mixed them together first) and Go over the paint using the same brush strokes. Then sprinkle some extra glitter over the top.
4. Immediately after painting with your Mod Podge, Lay your Lace Sheet, or Fabric over the board and press down evenly.
5. Flip the board over and pull the edges of the fabric tightly and secure them by painting Mod Podge over the Lace onto the wood board.
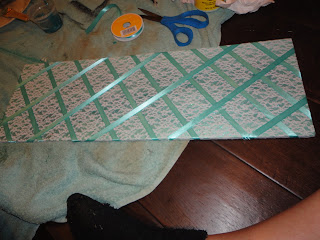
Here is what it looked like after Completing Steps 1-5
I love how the glitter shows through the lace- GorGeoUs!
Let dry for about 10-15 minutes -- Me and my girlfriend went and bought dinner- and learned Biance's "Put A Ring on it Dance" -- we are so lame!
6. Begin laying your ribbon diagonally and secure with a glue gun on the reverse side of the wood board.
7. Repeat going the opposite diagonal side and secure with glue as well. ( We did not glue the ribbon flat on the board-- we only glued them down on the back side of the board)
8. Then add rhinestones- using your fabric glue, and jewelry hooks ( We used the twist-screw- like hooks)
Then hang on your wall by securing a metal wall hanger to the back of your board!
Enjoy your new jewelry display and bragging rights!
What do you think? I had so much fun making my jewelry board with my gal pal! We decided this needs to happen at LEAST once a month! & Don't you worry, we will post photos! Hope you all have a lovely week!
also, I just Entered an AMAZING GROUP GIVEAWAY! Check out Glossy BLonde to find out more!


Wow! Wonderful job! Pinning it up for reference.
ReplyDeleteJaveriya
http://believeninspire.wordpress.com/
This is so so pretty!! I love the glitter showing through the lace! So I feel awful because you left me a tweet a while ago and I didn't notice it until like a week ago, and then when I came to your blog from my phone it wouldn't let me follow you. But now that I'm here from my computer I see why- cause I already follow you! :) I've just been bad at keeping up with blogs lately so I hadn't been here in a while. I just didn't want you to think I was ignoring your tweet. I'm glad you found me on Twitter so I could catch up on your cute blog again! I love love love this project- I'm pinning it now! What a fun thing to do with a friend!
ReplyDeleteOh super fantastic! Those boards are fantastic!
ReplyDeleteFriday nights in are the best! These came out beautifully! Loving the sparkly undertones! I made a similar one a few years ago and I am still loving it!
ReplyDeletexx
Holly Foxen Wells
GlamourMash
This looks so great ~ I love the touch of rhinestones!
ReplyDeleteI made one of those a few years ago and love it! I love the fabrics you used!
ReplyDeletexo